
Build Cross Platform ASP.NET Core MVC Web application in Windows subsystem for Linux.

Have you ever imagined of running .NET in Linux? it sounded like a crazy idea or a wildest dream of a Microsoft stack developer up until a couple of years ago. But not anymore… this is a reality now. With Windows Subsystem for Linux (WSL) in Windows 10 we can do many crazy things, one of such thing is running .NET applications inside Linux (yes your wildest dream is not a dream anymore, it’s a reality now).
Today we are going to witness one of such things by building a ASP.NET Core MVC web application in Linux. We are going to install .NET Core in native Ubuntu installation. Will build a MVC web application and then run it from Linux.
Check my previous post to know how to setup native Linux bash on Windows 10.
Okay…so first thing first. We need to install .NET Core in Linux, in order to do so – we’ll need to register the Microsoft signature key and add the Microsoft Product feed as a pre-requisite. This is needed once per machine.
PRE REQUISITE:
Let’s fire up the bash (windows key + R >> type bash and hit enter) and run the following commands. This will register the trusted Microsoft signature key.
curl https://packages.microsoft.com/keys/microsoft.asc | gpg –dearmor > microsoft.gpg
sudo mv microsoft.gpg /etc/apt/trusted.gpg.d/microsoft.gpg

Once you are done with registering the key, you need to Register the Microsoft Product feed. This command varies with the version of Ubuntu. To check Ubuntu version run lsb_release -a command in the bash. Look for the word Release and you will see the build number there. Based on the release version of your build you will need to run the command accordingly. In my case build number is 16.4, so I ran the below command.
sudo sh -c ‘echo “deb [arch=amd64] https://packages.microsoft.com/repos/microsoft-ubuntu-xenial-prod xenial main” > /etc/apt/sources.list.d/dotnetdev.list’
Check this for other various Ubuntu version specific commands.

By now you have completed all the pre-requisites of installing .NET Core. Now you have to install the real thing, – ‘The .NET Core‘ in Linux.
INSTALL .NET CORE IN LINUX:
Execute the following commands –
sudo apt-get update
sudo apt-get install dotnet-sdk-2.0.2

Okay…, lets now check whether .NET Core is installed properly or not? Just run the command dotnet
If you see your bash is trying to help you out with various options, then you know that .NET is installed in your Linux properly.

Now that you observed things are in place, let’s try to run our first .NET application inside Linux (yes this is the historic moment you have been waiting for  )
)
CREATE PROJECT DIRECTORY:
We are going to keep all our files and folders in an accessible location in Windows file system. Let’s pick either C drive or D drive. You can find these drives from bash in this path: /mnt
Go to /mnt by typing command cd /mnt
Now go inside D drive by typing cd d
Looked into all the contents of d drive using ls command
Use any existing folder or create new one. I am using a folder called WORK and there I will create a folder for our application.
I have created a dedicated folder named LinuxDotnet inside the WORK folder using mkdir LinuxDotnet command (name it as per your preference).
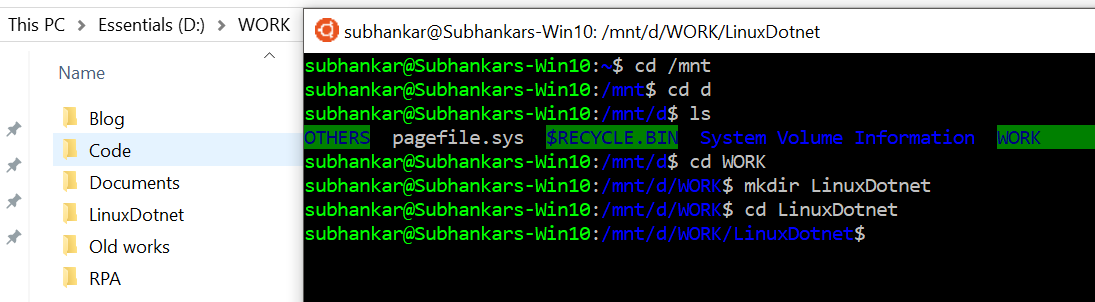
Once done you can see your Folder is created and you can see it from windows explorer.
THE DOTNET COMMAND:
If you want to know more about what dotnet command does, then type dotnet –help and see what all you can do with dotnet command.
We are not going to create any plain vanilla “Hello World” console application here like every one does. We are going to create a ASP.NET Core MVC web application. Let’s see what and how we can start from here.
Using dotnet new command we can create a new project of various supported template. Before doing this let’s see what are the options available for us.
Type dotnet new –help
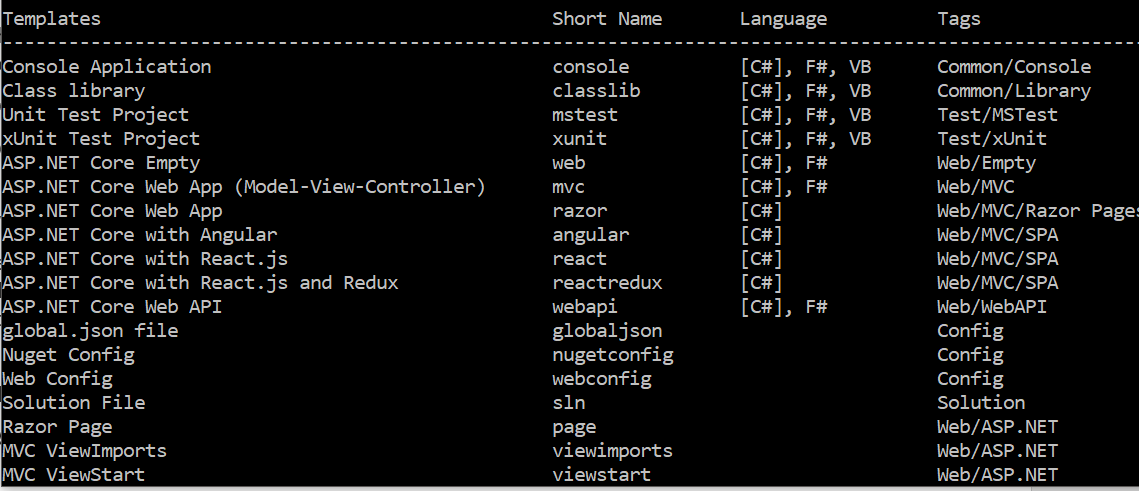
You can clearly see the number of supported templates, it allows you to create simple console app to class library to MVC, web app with Angular, so on and so forth. If you want to create a console application in C# use command dotnet new console -lang c#
Similarly, as we are going to build a MVC web app we are going to use dotnet new mvc command with appropriate options.
CREATING YOUR FIRST MVC WEB APP IN LINUX:
In your bash before creating the app you may want to see what are all the options available for mvc template by using the below command –
dotnet new mvc –help
we are going to create a new MVC app and since it’s our first application we are not using any authentication for now. We are going to use –auth None option. Our command will now look like this –
dotnet new mvc –auth None
run this in bash
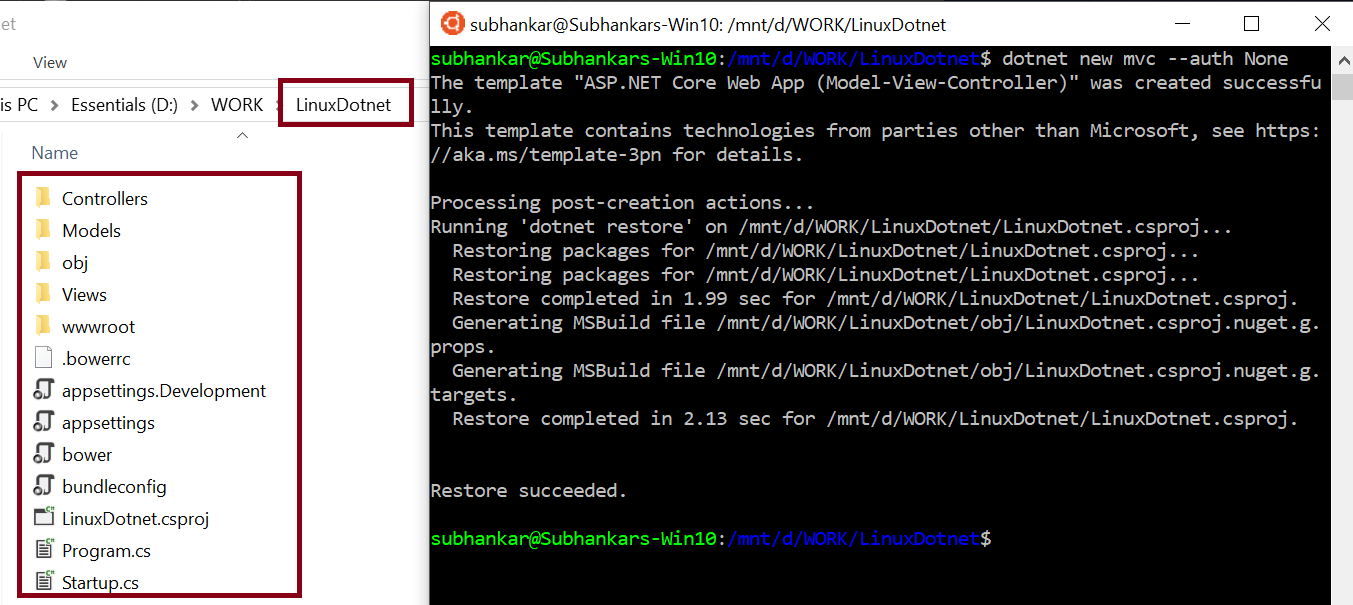
Observe that inside the project directory, a lot of files and folders got added. This is the default template structure of ASP.NET Core MVC web application. If you create a new project from Visual Studio then also you will see the same file and folder structure.
The application from the default MVC template is created now, it’s time to run it. Before firing up the run command, package restoration is needed. Run dotnet restore for restoring the packages.

RUN YOUR FIRST ASP.NET CORE MVC APPLICATION:
Okay we are in the final stage to run our ASP.NET Core MVC application from Linux.
use dotnet run command and observe the bash.

Your application started running in http://localhost:5000 . (This port number may not be always the same.) Open this URL in any browser of your choice and see the magic…
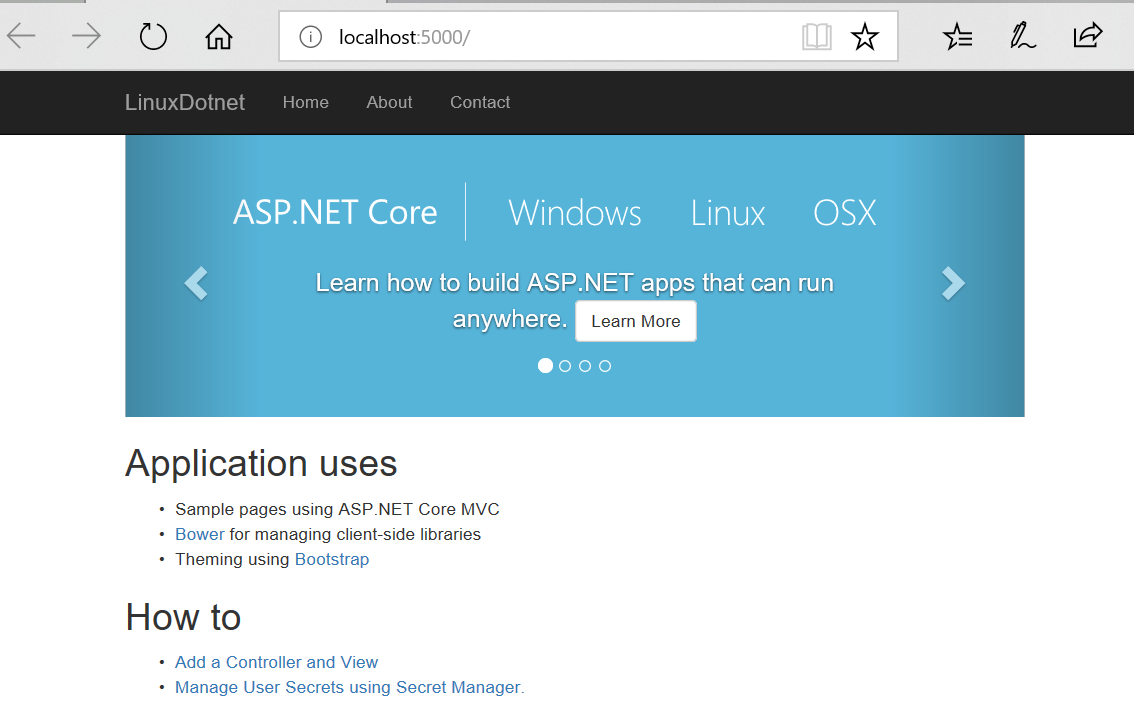
There you go… you have your first .NET Core app running in Linux. You are now looking into a ASP.NET Core MVC web application running inside Linux in your browser. Yes a Microsoft product running in Linux.
So…Congratulation on your first ASP.NET Core MVC app on Linux.
SEE X-PLATFORM DEVELOPMENT IN ACTION:
Now lets try to see whether we can modify the project in Windows 10 in a Visual Studio IDE and run it back from Linux again. By doing so we are testing cross platform capability to it’s best – develop in one platform run it in another platform.
Before we do so exit from the app by pressing Ctrl +C in the bash.
As we have created the project inside D:\WORK\LinuxDotnet directory. Navigate to that path and open the project file (.csproj) in Visual Studio.
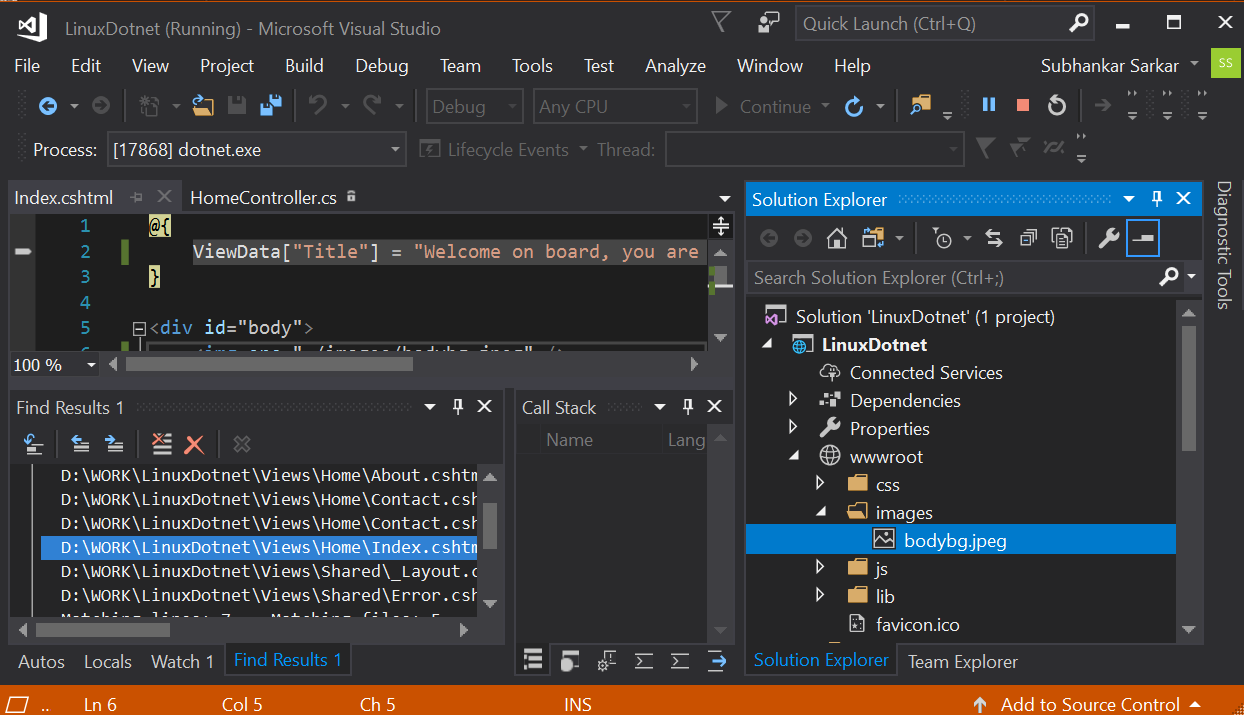
Modify the code in Visual Studio IDE as you would like to. Save it, if you want to build and run it in IIS then you can do so also. Here we will run the IDE modified code back from Linux. So…go back to to the bash and open the site using dotnet run (make sure you are not running the website in debug mode in Visual Studio before running it from bash), check the url in the bash and open the url in a browser.
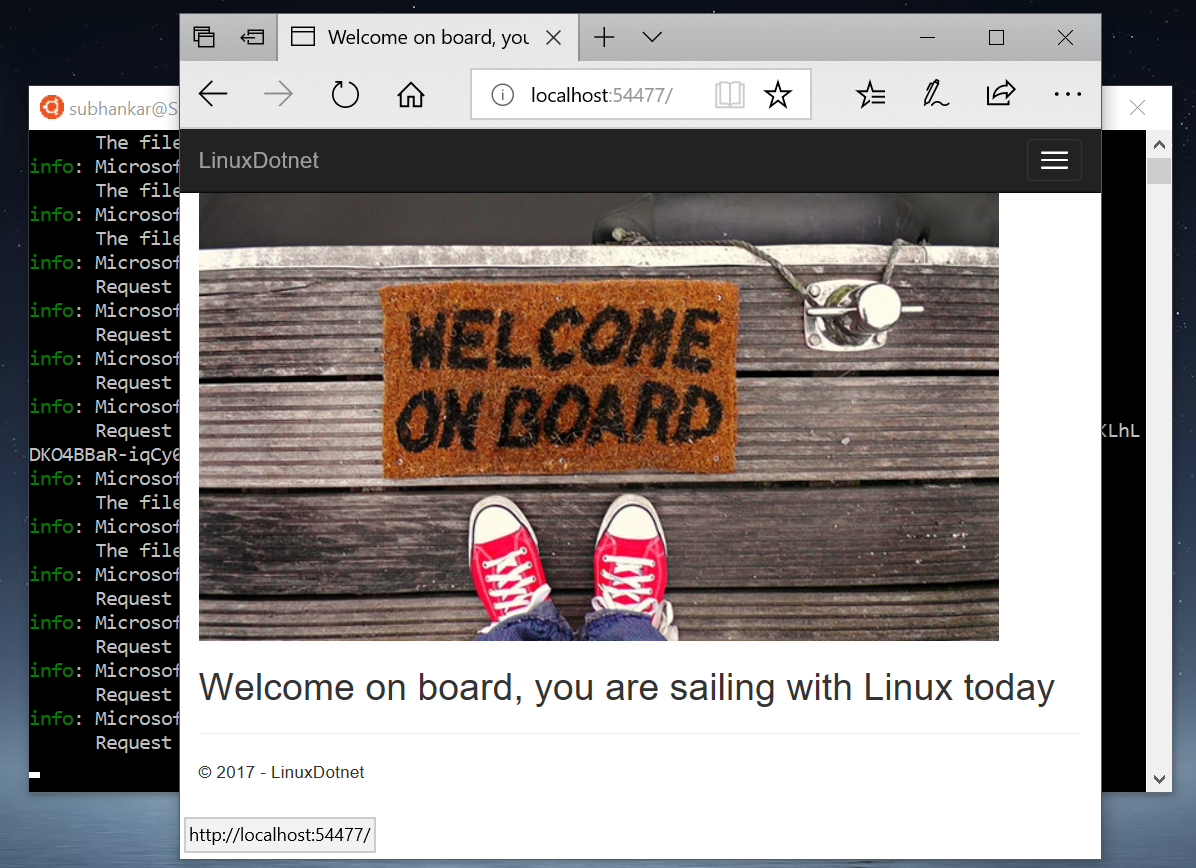
Can you see the new website that you have just modified in Windows? yes you just ran a MCV application created in native Linux, modified in Windows using Visual Studio and executed back in Linux.
Now it’s time to conclude. In this article we have covered how to prepare your native Linux installation on Windows for .NET Core applications, how to create and run your first ASP.NET Core MVC web application and finally modified the application in Visual Studio for Windows and run it back in Linux.
In my upcoming post, will talk about installing SQL Server in Linux.
Till then stay tuned and stay healthy.